Sunday 27 April 2008

Background Swap Bound


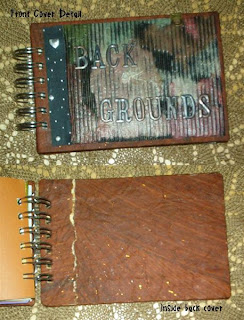
Well it took me all day, but I got the Byhand Artists Background Swap pages bound yesterday, and I did it all myself. I was going to ask for help, but I slowly cut my way through the chipboard covers. I had an extra piece of my background technique set aside with the metal letters just waiting for the rest to arrive. I chose the cover paper from a Glorious Glitter package of handmade scrapbook paper and covered the front and back covers with the same paper. I glued the letters on my swap sample with No More Nails glue. This was then glued to the cover. For a design detail, the small piece of black and silver paper from the Dark Shadows handmade paper pack was added to create a little glamour. I fastened all the instructions to their respective pages and created a title page, dedication and table of contents.Another design detail of a torn paper on the inside back cover was added for a bit of a rustic touch. I like glamour and rustic together. Now came the big challenge, could I use my wonderful Zutter Bind-It-All, available from Quietfire Design, with my left hand? I love the Zutter, it was a breeze to use even left handed. That is except for one little glitch, all the layers of decorative paper and the corrugated made the covers too thick to go into the Bind-It-All. I couldn't waste all that effort and materials, so I cut a small piece of the corrugated and pealed a layer of paper off the two cover pieces. Success, it went in and the holes were punched like going through butter. So here come the design details, otherwise known as cover up your big mistakes and end up with a finished book that is, in my opinion, even better than planned. For binding I used 1 inch silver wires. I am very pleased with my book and thanks to all the artists who contributed it will be a valuable resource and inspiration. I think it will live near my creative space in the attic.
Thursday 24 April 2008

Byhand Artists Newsletter Anniversary


Now that I am sure that Suzanne of Quietfire Design has received my entry for the Byhand Artists Newsletter anniversary contest I can show you what I sent to her. I reworked a previous piece I made about knitting on the porch next to the lilacs. I tried to word this piece to more closely reflect Suzanne's interest and I sure hope I succeeded. The words are: "The gentle curve of a wrist. The flash of a pen. The letters flowing from the nib to the paper. The words building on the page. The shade of the front porch. The scent of lilacs on the gentle breeze in June. This is paradise. This is were I am at." I started with coffee stained watercolour paper and printed the lilacs and words on. I then stamped the flourishes with cocoa pigment ink and the Quietfire Design rubber stamp quote with green ink. This was backed with purple cardstock and clipped to the altered clipboard which is in an earlier post.

ATC Behind The Pink Curtain

I haven't posted for a few days, but I got 1 more danglie made on Sunday. I won't show you that, it's pretty much like the others but has a different photo. I also got 3 ATCs done. This is for the April 2008 swap and the themes are pink and time. The girl is a digital image found on the internet and I printed on a shaded pink to lilac background. I added the pink cheesecloth with matt medium then glued the pink seed beads on.

Saturday 19 April 2008

Three More Danglies


I am quite pleased with my progress on the danglies today. I have completed these 3 and have 2 more ready just waiting for the beads. These are done the same way as the first one, just the image and selection of beads have changed. I really like the pansy one on the left in the photo. These are so much fun despite the challenge of picking up the beading needle with fingers that are reluctant to bend.

Friday 18 April 2008

Danglie


Our Byhand Artists Yahoo group is having a danglie swap so here is my first ever danglie which I decided to try out before I sign up to the swap. Since my right hand still has limited use I wanted to be sure I could complete the swap and now I am sure I can. I used a wooden piece which measues .75 in. X 1.5 in. and has 2 holes drilled from top to bottom. I have about 8 to 10 different photos sized to fit and for the first one I used the single red pear image, some assorted biege and redish beads on heavy cotton thread in coffee colour. The image is applied with matt medium and is finished with a coat of craft varnish in gloss.

Saturday 12 April 2008

Altered Clipboard


I finally got back to some creating today and altered a small clipboard (6X9). Since my right hand is still not fully functioning, this is still mostly done left-handed. I lightly sanded the front of the clipboard, then brushed on a coat of gesso. Next I applied matt medium and pressed white tissue paper on, allowing it to crinkle. I applied more matt medium on the tissue and folded the excess overhang back on top and allowed more crinkles to form. More matt medium was brushed over and acrylic paint was sponged on while the matt medium was still wet. I used African Violet, Lavender, Antique white and Maple craft acrylics. When that was dry I sponged on Spun Gold and Morning Silver. When this was dry I used brown Stazon to stamp most of the images from the Mini Compilation collection rubber stamps from Quietfire Design. Three sizes of paper flowers were assembled with a brad and glued to the clip along with several fibres. For the back I cut 2 pieces of paper from Memory Stor Handmade Paper collections, one from Deep Shadows and one from Natural Neutrals. I stacked the 2 together and tore them, then used 1 of each torn piece glued to the back.

Sunday 6 April 2008

ATCs Girl in Pink


Here are some more ATCs I've been working on today. I used a pink cardstock and stamped a background text stamp with cocoa pigment ink. For the first ATC I stamped the same text stamp with Stayzon ink on a white plastic slide mount, inserted the photo and used foam mounting tape to fasten it to the ATC. The bottom is trimmed with ribbon and a pink button. The second ATC uses a cardboard frame held in place with brads, the same ribbon and a metal ribbon slide.

Time Theme ATCs


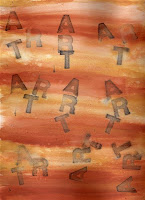
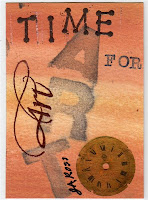
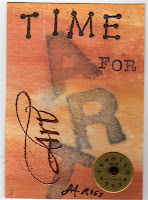
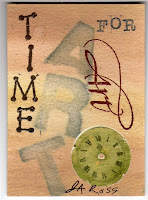
This is another background piece I did at the same time I did the one from the previous post. I used the same colours and this time stamped "ART" with black dye ink and misted with water. After scanning the sheet, I added a digital clock image and cut 6 ATCs from the original background. These are 2 of the ATCs and one has a watch face fastened on with a brad. The last 2 ATCs are from the scanned background printed at 80% tint. All of them are then hand stamped and embossed.